The first one we'll look at is my game with white against the Polish grandmaster Kamil Dragun (FIDE 2578). This was played in the 2018 Atlantic Open in Virginia. The opening was relatively benign (there's no need to go through it in any detail), and after an early queen trade we reached the following endgame:
Paciorkowski-Dragun; 2018 Atlantic Open
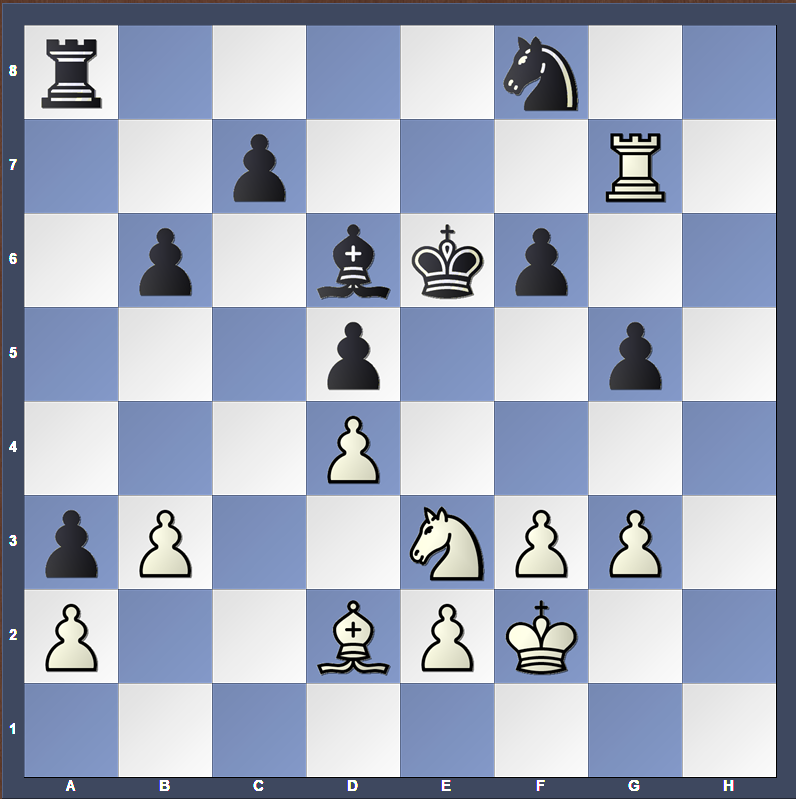
1.Nf3 Nf6 2.c4 e6 3.g3 b6 4.Bg2 Bb7 5.0-0 Be7 6.d4 0-0 7.Nc3 Ne4 8.Nxe4 Bxe4 9.Ne1 Bxg2 10.Nxg2 d5 11.Qa4 Qe8 12.Qxe8 Rxe8 13.cxd5 exd5 (D)

This is where I want to start the discussion. Theoretically, this endgame is supposed to be equal, right? Equal material, both sides have a pawn in the center, both sides don't have any glaring issues with their king, and so on. However, "equal" is not synonymous with "drawn". There are some important subtleties in this position that make the endgame rich with ideas; I explain them below.
1) We have an asymmetric pawn structure. White has an e-pawn vs. black's c-pawn. This simple enough fact by itself already gives the position some life and creates an imbalance.
2) Black's pawn is on b6, not on b7. Well, why on earth should this matter? It seems like such a tiny little detail that nobody would even bother to think of it. Yet, if you put this position in front of a grandmaster, I guarantee you that they will immediately highlight this factor as being one of the most significant talking points about the position.
Imagine that the pawn was back on b7 for a moment. Now, compare the position above to this position:

What's the difference? Well, in both cases, white's only open line for his rooks is the c-file. However in the second position, black's pawn on c6 is solidly defended by the pawn on b7; in fact, the entire b7-c6-d5 chain is quite resilient and it will take a large, organized effort for white in the form of a minority attack with b2-b4-b5 to put any pressure at all on black's structure.
Now look again at the first diagram. Because black's pawn is on b6, he can never set up this b7-c6-d5 chain. In fact, as soon as white puts a rook on c1 he will immediately be putting pressure on the backwards pawn on c7, which black can only ever solve by playing c7-c5. At that point, white would take d4xc5, and black either recaptures with a piece, in which case he is left with an isolated d-pawn, or he recaptures with the pawn, in which case he is left with this hanging pawn structure, which I show below.

Now, if black can get a position like this, he will have essentially fully equalized the game. Granted there is plenty of play left, but black's slightly inferior pawn structure (3 islands vs. 2 for white) is fully compensated for by his control of the center, potential targets on b2 and e2, and the potential for good piece activity.
So with all that in mind, let's go back again to the starting position for my endgame against Dragun:

We know that if black can achieve c7-c5 without any major concessions, he should be completely fine. But if white can stop him from doing that, then black will essentially be forever saddled with this backwards pawn on the c-file. So, from this position, we should know that white's objective is to not allow black to play c7-c5, and if white can succeed in this, then in theory, the position won't be equal, but white will be slightly better.
Now, let's finally start going through the game. It's white to move in the diagram, and I continued with 14.Rd1 (D)

To the untrained eye, unaware of white's strategy, this move looks more or less random. But hopefully now you can see that the point is to prevent 14. ... c5 because after 15.dxc5 bxc5 16.Rxd5 white simply snaps up the undefended d5 pawn. Dragun replied with 14. ... Bd6, which looks attractive because it attacks e2, but believe it or not I would argue that this move is already slightly inaccurate because it does nothing to help black play his c5 break.
In 1987, none other than Anatoly Karpov himself actually had this exact same position with black against the strong Swedish GM Ulf Andersson (who famously made a career out of playing these kinds of endgames with white for a win). Instead of 14. ... Bd6, Karpov continued with 14. ... Na6! 15.Be3 Rad8! defending his d-pawn. He soon followed up with c7-c5 and equalized the game, which ultimately ended in a quick draw.
Now, back to my game. After 14. ... Bd6, my e-pawn is hanging, so I shield the e-file and develop my last minor piece with 15.Be3 Notice how even this bishop has its eye on the c5 square. The game continued further with 15. ... f6 16.Rac1 g5 (D)

Now I am fully developed, and most of my pieces are directly fighting against the c5 break. With black's last move (g7-g5), he takes away the f4 square from my knight. At the same time, it opens up a hole on f5 and weakens his king a little, and moreover black still has to develop his queenside pieces.
So how to proceed with white? We've developed everything and for now black cannot play c5, but what to do next? Well, look at white's position and find the worst-placed piece: that's the Ng2, which is just sitting there doing nothing. Now ask yourself where that knight should go. The most obvious square to me was f5, which has just been weakened with black's latest g-pawn thrust. But you'll notice it's kind of tricky to maneuver it there; e3 is already occupied by my bishop, and if my bishop moves away I hang e2. So I came up with an interesting plan of f3, Kf2, Bd2, and then finally Ng2-e3-f5. In the meantime black decided to embark on quite an ambitious expedition with his a-pawn on the queenside.
From the diagram above, the game continued 17.f3 a5 18.Kf2 a4 19.Bd2 a3 20.b3 (D)

Notice how I just completely ignored black's demonstration on the queenside. I could have stopped him with a2-a4 or a2-a3 at some point, but both of those moves would have created holes in my position on either b4 or b3 which his knight could eventually maneuver to. Now the queenside remains semi-closed and black still cannot play 20. ... c5? since the simple reply 21.Ne3! just wins the d-pawn; after 21. ... cxd4 22.Nxd5 white has all of his pieces mobilized and threatens both Nxf6+ and Nxb6 with a winning position.
From the diagrammed position, it's black to move, and my opponent played 20. ... Kf7 (D)

The idea behind his last move is to meet 21.Ne3 with Ke6, defending both the d5 and f5 squares. So what should we do next? Black's kind of stopped our knight maneuver for now, so maybe we should look for another plan in the meantime. Later, we can always play Ne3 to hit d5 and threaten to jump into f5.
How do you find a plan in positions like this? If you've already more or less optimized your pieces, then you should move on to consider pawn breaks. This makes logical sense. If you are better mobilized and developed, then by simply opening up the position with a pawn break, you can often take advantage of your superior piece activity to win some material.
So what are white's pawn breaks here? I see three of them: e2-e4, f3-f4, and h2-h4. All of those moves are pawn breaks because they create pawn tension - if you play any three of them, you will be threatening pawn takes pawn to open the position. Go ahead and take a moment to see which one is the best for white, and then I'll talk about each one in detail.
The e4 break might seem attractive at first glance because it's in the center, but the strategic problem with it is that it would allow black to liquidate one of his big weaknesses - the pawn on d5. Suppose white got two moves and played Rd1-e1 and e2-e4. Then black would absolutely play d5xe4 and it doesn't matter how white recaptures; black's next two moves are Nb8-d7 and c7-c5, after which white's advantage is probably only minimal, if existent at all. Remember, black cannot play c7-c5 right now because then his d5 pawn would become exposed and vulnerable to capture. If we ever play e4, black could exchange pawns and his weak d5 would disappear. Taking all of that into consideration, e2-e4 is not the strongest plan, at least not right now.
The f4 break is interesting, and if black took, you could recapture with the knight and put some problematic pressure on d5. However, f3-f4 is positionally risky, because you create a hole on e4. Although black's knight can't get there now, it could later in the future and then you'll wish you still have a pawn on f3 to kick it out. In fact, after 21.f4, black could even immediately play Re4, attacking my d-pawn, and then follow up with h7-h6, reinforcing the pawn on g5. So f4 is not correct here either.
That leaves h2-h4! This is much stronger than the other two breaks simply because it doesn't create any weaknesses in my position. My plan is straightforward: I want to open a second front on the h-file and start invading there with my rooks.
So from the last diagram, it's white to move and I played 21.h4! to which Dragun replied 21. ... h6. After 22.Ne3 Ke6 23.hxg5 hxg5 24.Rh1 (D) we reached the following position:

What should black play here? Take a moment and think about it; we'll revisit this position at the end of the post.
The actual game continued 24. ... Nd7 25.Rh7 Rh8 Black contests the open file 26.Rch1 Rxh7 27.Rxh7 Nf8 28.Rg7 (D)
So thanks to my opening of the h-file I've managed to invade on the 7th rank, and you should notice now that black's king actually has no squares! Also, it's move 28 and black's rook on a8 still hasn't moved. In this position, black finally achieved his pawn break with 28. ... c5 but at this point white has enough of an advantage that this move doesn't equalize anymore. The focus of the game has shifted. Now, instead of c7-c5 being the most important factor, my active rook on the 7th cutting off his king on e6 has become the most important factor. I simply ignored my opponent and brought another piece closer to the attack with 29.g4! Rc8 30.Nf5 (D)

Now I have the dangerous threat of Rg7-b7, attacking b6 and threatening Ng7 mate! Objectively, black should play 30. ... Rc7 to trade the rooks off, but even then I can simply continue with 31.Rxc7 Bxc7 32.Bc1! and pick up the a3 pawn, giving white excellent winning chances.
Instead, Dragun played 30. ... cxd4 (D)
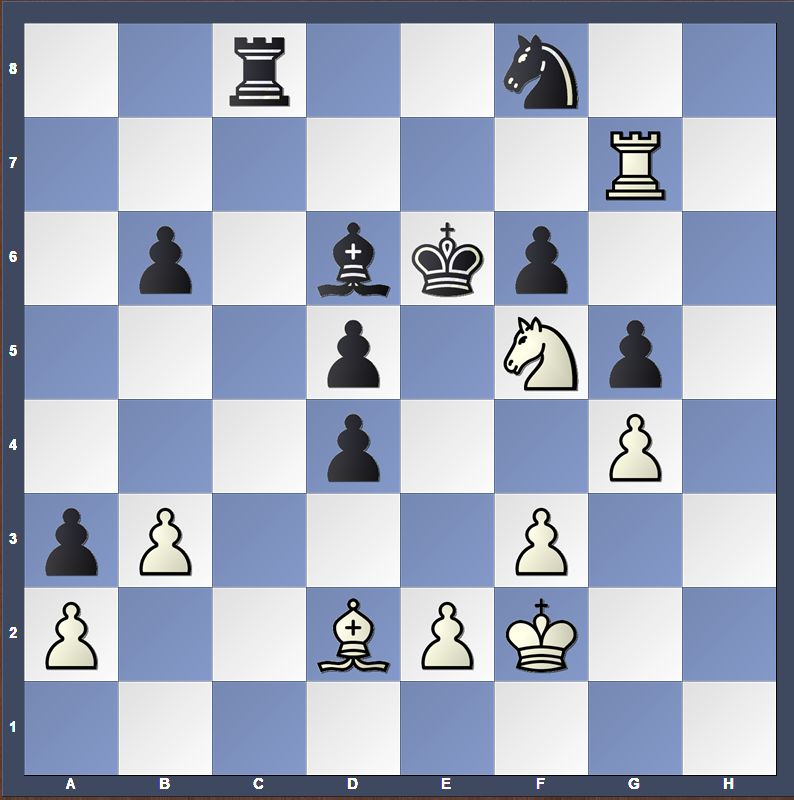
Now white can actually win material by force, and there are two different ways to do so (see if you can find both of them). I only saw the second-best way, but it is still good enough: 31.Nxd6 Kxd6 32.Bb4+ This is the point: if black plays 32. ... Ke6 he is mated in one with 33.Re7, but if he goes anywhere else then I play Rg7-g8 and there is no way for him to defend the pinned Nf8. Black is lost, and the game finished with 32. ... Ke5 33.Rg8 d3 34.Ke3 One last accurate move to stop black's counterplay. 34.exd3?? allows Rc2+ which unpins the Nf8 with advantage to black. 34. ... dxe2 35.Kxe2 Kd4 Or 35. ... Rc2+ 36.Kd3 with a double attack on rook and knight. 36.Kd2 (D)

Black resigned as there are no more tricks and the Nf8 is lost. Strangely enough black is actually up a pawn in the final position!
Now I want to revisit a couple key moments.
Position 1: After the move 24.Rh1

I would call this a critical moment. In the game black played 24. ... Nd7 so that after 25.Rh7 he could play 25. ... Rh8, challenging the h-file, which is logical and what I expected. However, in actual fact black could have ignored the h-file and gone for counterplay with 24. ... c5! My intention (and what black may have been worried about) was 25.Rh6 cxd4 26.Ng4, when I thought white would be doing well since I am threatening both Rxf6+ and Bxg5. However, in reality black can simply play 26. ... Nd7! defending f6 and after 27.Bxg5 Rh8! material is equal and the position is unclear.
Position 2: After 30. ... cxd4

I mentioned that white actually has two ways of winning material. The way that I played is good enough, but well done if you spotted the brilliant 31.f4!! when the threat is 32.Nxd4# and 31. ... gxf4 runs into 32.Bxf4! when black cannot take the bishop because of mate on e7! After 32. ... Bc5 the final blow is 33.b4! overloading the bishop, which cannot move without allowing either Nxd4# or Re7#. It should be no surprise that the strongest continuation involves getting white's last piece into the attack.
I hope you enjoyed that game, and I look forward to sharing a couple more like this!
Hey Lev, this is TJ, I just wanted to take a moment to thank you for all of the games of yours and analyses you've posted here, they've helped me improve my game a lot. It's been great to look at these games and understand what your ideas are and what is actually going on in the position. It's especially helpful to have insight into your thinking process as your playing the game, instead of an analysis of a game played by someone else. I particularly liked your game against Bryan Smith, it had a lot of ideas in it I found very instructive. Thanks a bunch and I hope to see more of your epic wins soon!
ReplyDeleteHello TJ! I'm glad to hear your enthusiasm. Stay tuned for more coming up and happy new year!
DeleteThanks you too! Happy New Year!
Delete