Wednesday, January 23, 2019

Scholastic 2019 Winter Chess Tournaments


Jan 19th   at The Harley School   27th annual   9am-12:30pm
Jan 26th   at India Community Center   12th annual   9am-12:30pm
Feb 2nd   at Geneva North Street School   13th  annual   9am-12:30pm
Mar 2nd    at Seton Catholic School   23rd annual   9am-12-30pm
Mar 23rd   at Chess Center “ Woman’s + Girl’s”   17th annual   9:30am-3:00pm
Apr 27th    at Wayne Elementary School   4th  annual   9am-12:30pm
Also, at Rochester Chess Center 10am-1pm $5 entry: Jan 12, 19; Feb 9, 16, 23; Mar 9, 23, 30; Apr 6, 13, 20
For more experienced players @ Saratoga Springs   52nd  annual   NY State Scholastic Championship Mar 9,10;
@ Strong Museum of Play   41st annual   Marchand Open Mar 16,17.

Sunday, January 20, 2019

Game of the Month: Everything you ever wanted to know about the Stonewall

Hello and welcome everybody! This is the inaugural edition of a new series where people may submit their games to me and each month, I will select the one game that stood out to me as the best and analyze it in detail. For this first one, I've combined October, November and December together but at the end of January I'll pick a new game from just that month.

Anybody of any rating level can submit a game! To find out how, feel free to see Mike Lionti at the CCCR on Wednesdays.

I picked the following game for its high instructive value in one of the more common openings seen at the club level which is often badly misplayed.

Birmingham, Gerry (1300) - Strazzabosco, John (1513)
CCCR Club Championship 2018, Round 5
10/24/18

1.d4 d5 2.e3 Nf6 3.f4!? e6!?

White has quickly taken to setting up the Stonewall formation; however, he has done so via an imprecise move order. As a result, black had a much more desirable option on his third move in 3. ... Bf5!, taking advantage of the fact that white hasn't yet posted his bishop on this critical diagonal. Without the strong bishop on d3 to attack h7, white's future kingside attacking chances will be greatly diminished.

4.Nd2 c5! 

White's plan is to attack on the kingside, so black must be prepared to seek counterplay on the queenside!

5.c3 cxd4!?

Not necessarily a bad move, but there is absolutely no harm in maintaining the tension, so I would instead prefer to continue development right away with 5. ... Bd6.

It is important however, that black decided not to close the position with 5. ... c4? This would be a huge positional mistake because then he would never be able to open the c-file later! Without an open c-file, black's queenside counterplay will be both weaker and slower.

6.cxd4?!

Yes, as a rule you should recapture towards the center whenever possible, but as with all rules in chess, there are exceptions. In this instance, white should prefer 6.exd4! because it keeps the c-file blocked and opens the e-file for a future white rook on e1.

6. ... Nc6 7.a3 (D)


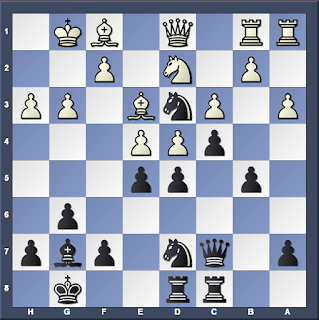
Birmingham's last move was played prophylactically to prevent ...Nc6-b4 after Bf1-d3. White has an iron-clad grip on e5 but at the same time has made six of his first seven moves with pawns. Black has a slight lead in development and already has managed to open the c-file (with a little help from his opponent). All of this combines to give black a comfortable advantage here. However, it will require precision over the next few moves to maintain that advantage!

7. ... Be7!? 8.Bd3 Bd7!?

Black's last two moves were routine development but important inaccuracies, and are the source of his upcoming difficulties. Far more effective development would be Bf8-d6 and b6-Bb7. That way, black would be well-prepared to occupy the e4 square and shut down white's strong attacking bishop on d3. For example, instead of 7. ... Be7!?, after 7. ... Bd6! 8.Bd3 0-0 9.Ngf3 b6! 10.0-0 Bb7 11.Ne5 Ne7! 12.Qf3 Nf5! black may continue further with Be7 and Nf5-d6-e4 after which white will have a tough time generating an attack without the services of his light-squared bishop. Black's last two moves are suboptimal because he can no longer complete such a maneuver.

9.Ngf3 0-0 10.0-0 Rc8 11.Ne5 (D)


Despite his earlier mistakes, white now has everything he wanted from the opening while black is visibly struggling to find a good plan. There may not be anything better for black than to play defensive moves like g7-g6 and Bd7-Be8, awaiting events.

11. ... Nxe5?!

I suspect this was played with a good plan in mind, but for tactical reasons it only exacerbates black's difficulties. After white's next move the Rf1 gets extended scope and the Nf6 is forced to retreat from its good defensive position.

12.fxe5 Ne8 13.Rf3 f6!? 14.Rh3 g6? (D)


In theory, if black can get away with this f7-f6 break and open the f-file, then he can quickly activate his pieces and get a large initiative. At the same time, it's risky business to push pawns in front of your king like that! It would have been better instead to close things with 14. ... f5! to avoid what could have been a devastating tactical shot.

15.Bxg6?

Unfortunately, this is the wrong sacrifice. Instead, the thematic 15.Rxh7!! would put black's king in dire peril, as 15. ... Kxh7? gets mated after 16.Qh5+ Kg8 17.Qxg6+ Ng7 18.Qh7+ Kf7 19.Bg6#

15. ... hxg6 16.Qg4 (D)


Now it is black's turn to find an accurate defense.

16. ... g5?

Unfortunately this allows white to get back into the game. As an exercise, try to find the best defense for black! The answer will be at the end.

17.Qh5 Threatening immediate mate. There's only one defense. 17. ... Ng7 18.Qg6!? Creating the crushing threat of 19.Rh7 Rf7 20.Qh6 with unstoppable mate, but black can parry this easily with his next move. 18. ... Qe8 (D) offering a queen trade which white cannot accept.


This is the last critical moment of the game. White is down a piece but can in fact force a draw here. This will be the second exercise, with the answer at the end.

19.Qd3? f5 After this, black is just up a piece and has a better position, while white's attack is nonexistent. The rest is trivial conversion. 20.Rf3 Bb5 21.Qb3 g4 22.Rg3 Bh4 23.e4 Desperation. 23. ... Bxg3 24.Qxg3 dxe4 25.Nb3 Qd8 26.Qf2 b6 27.a4 Bc4 28.Nd2 Bd3 29.b3 Rc2 At last black takes advantage of the open c-file! Soon it is white's king that will come under attack. Also we're at move 30 and white's queenside rook and bishop have yet to move. 30.Ba3 Re8 31.Bd6 Qg5 32.Rd1 Rec8 33.Bb4 a5 34.Nxe4 Bxe4 35.Qe1 0-1

There are a couple important takeaways from this game.

1) When white sets up the Stonewall formation, one of the most essential strategies for black is to occupy the e4 square with a knight to block white's light-squared bishop. To do this, black needs to have his own light-squared bishop fianchettoed on b7 and may need to come up with some lengthy knight maneuvers (for instance c6-e7-f5-d6-e4). If black can successfully execute such a maneuver, typically he will be better.

2) The c-file is one of the most important files to pay attention to. If it becomes open, black can quickly double or even triple major pieces there to threaten infiltration into white's camp. If black closes it by playing c5-c4, then he loses the ability to get that kind of quick counterplay and makes white's game much easier.

Now, the answer to the exercises:

Exercise 1: Instead of 16. ... g5?, 16. ... Kf7! would transfer the king out of the danger zone. For example after 17.Rh7+ Ng7 18.Rh6 g5! black's king can always run away to e8 and white does not have compensation for a piece. Nor does 17.Rh6 Rg8! accomplish anything for white either.

Exercise 2: Instead of 19.Qd3?, after 19.Qh7+ Kf7 20.Rh6! black has to accept a perpetual after something like 20. ... f5 21.Qg6+ Kg8 22.Qh7+ Kf7 23.Qg6+. The attempt to avoid it with 20. ... Rg8? fails to 21.exf6! Bxf6 22.Qg6+ when white regains his piece with a big advantage.

Wednesday, January 2, 2019

My Best Games: vs. IM Kevin Wang

Happy new year! In this sequel to my last post, I'll be analyzing one more of my best games, this time against International Master Kevin Wang, who I played in the 4th round of the 2018 Washington Chess Congress, held in Falls Church, Virginia. In contrast to my game against Dragun, where we had an uneventful opening that skipped right into the endgame, this game had a little more action!

Wang-Paciorkowski; 2018 Washington Chess Congress (round 4)

1.e4 g6!?

This is a highly provocative opening choice, especially against a strong player. To provide some context, at this point in the tournament I had 2.5/3 after having beaten GM David Berczes with black in round two and then drawing GM Alexander Shabalov in round three; I very much wanted to maintain my momentum and was playing for a win with black. However, instead of going into any sharp hyper-aggressive lines right out of the opening, my opponent opted for a calmer approach.

2.Nf3 Bg7 3.g3 d6 4.Bg2 Nf6 5.d3 (D)


White sets up a reversed King's Indian formation which soon turns into almost a kind of Closed Sicilian. The game continued 5. ... c5 6.0-0 Nc6 7.c3 0-0 8.Nbd2 (D)


Normally in the Closed Sicilian, white's knight is actually on c3 and later (after Nf3-e1, f2-f4 and sometimes g3-g4) re-routes either to e2-g3 or to d1-f2 combined with a pawn storm on the kingside. Instead of that, my opponent wants to play more directly in the center and makes preparations to play d3-d4. Meanwhile, my position is solid and I decide to harmoniously complete development.

8. ... Qc7 9.a3 This is a useful prophylactic move in these kinds of positions to give extra cover to the b4 square. For example, on the immediate 9.d4?! white always has to consider the consequences of 9. ... cxd4 10.cxd4 Nb4!? (10. ... Bg4! is also a strong move that should be considered), aiming at c2 and d3. On the minus side though, 9.a3 wastes a move with a pawn and opens up a hole on b3, which may or may not become important later...

9. ... Rd8 10.Re1 White still was not ready to play 10.d4?! since after 10. ... cxd4 11.cxd4 the thematic response 11. ... Bg4! puts uncomfortable pressure on the fragile center pawn duo. If one of them is forced to prematurely advance, they could become weak targets rather than strengths.

10. ... Ne5!? (D)


Offering white to exchange on e5 so I can open the d-file for my rook.

11.Qe2 As I had anticipated, White declines to make the trade. After 11.Nxe5 dxe5 white has to figure out what to do about his backward pawn on d3 which could turn into a weakness later. Now, white plans d3-d4 with tempo to finally establish a strong duo of pawns in the center. In response I quickly activate the rest of my pieces.

11. ... Bg4 I was less satisfied with the more passive 11. ... b6!? 12.d4 Nxf3+ 13.Nxf3 cxd4 14.cxd4 Bb7, when white could gain space with either 15.d5 or 15.e5!?, perhaps with some advantage.

12.h3 Bxf3?! 12. ... Bd7 13.d4 Nxf3+ 14.Nxf3 e5!? was strictly speaking a better option, not giving up the bishop pair. However, I had a specific plan in mind which will be revealed shortly. 13.Nxf3 Rac8 14.Be3 (D)


This is an important moment. I have willingly given up the bishop pair, but at least white had to waste a tempo with h2-h3 to get it, and in the meantime I have fully completed development. However, if I dawdle around, white will continue with something like Rac1 and d3-d4 occupying the center, after which my position will quickly become cramped and unpleasant. So to avoid running into a worse position like that, I have to come up with some kind of plan for counterplay either right this move, or on my very next turn. Fortunately, I did in fact have such a plan that I had been thinking about since move 11. It may not have been objectively the best way to play, but it certainly led to an interesting position after a couple more moves.

14. ... Nfd7 A preparatory move... 15.Nd2 (D)


White also makes a preparatory move. Instead, on the immediate 15.d4!? I can play 15. ... Nxf3+ 16.Bxf3 cxd4 17.cxd4 and continue with either Qc4 or Qc2, getting a little counterplay via the c-file. Now that white's knight is on d2, my Ne5 will having nothing to take on f3 and so will be forced to retreat after the imminent d3-d4. Now is the time for me to reveal my plan...

15. ... c4!? This is my ambitious idea. If white bypasses with 16.d4, then I plant a strong knight on d3 and can wreak all sorts of unpredictable havoc in white's camp from there. If white exchanges with 16.dxc4, then after 16. ... Nxc4 17.Nxc4 Qxc4 18.Qxc4 Rxc4 we get a complex ending  - white has some advantage thanks to the bishop pair, but black is not without play and can create something on the queenside with a timely b5-a5-b4 minority attack. My knight on d7 is well prepared to meet the Bxa7 pawn grab with b7-b6, trapping the intruder.

My opponent chose not to enter the endgame and we continued with 16.d4 Nd3 17.Reb1 b5 (D)


The game has now become double-edged. It is difficult to say at the moment if the knight on d3 is more of a strength or a weakness. Right now its powerful influence radiates in all directions deep in enemy territory, but if white has time to undermine my supporting pawn chain with b2-b3 and a3-a4, then my intrepid explorer could get in trouble since he has no retreat squares! In any case, this is actually the most critical moment of the whole game and fortunately for me, my opponent did not make the best decision.

The game continued 18.Bf1?! (D)


My opponent's last move has the plan of Qd1, Bxd3, Qd1-f1 and finally Qf1-xd3 to win a pawn, but this is way too slow. It actually would have been quite strong to play more energetically with 18.a4! when after 18. ... a6?! 19.axb5 axb5 20.b3! white opens the queenside for his otherwise awkwardly placed rooks and starts undermining the support system for the Nd3. It seems that white would have a significant advantage in that position.

From the diagram, I wasted no time and vigorously opened the center to clear lines for my pieces: 18. ... e5! 19.Qd1 White was unwilling to play 19.d5!? himself, liberating the c5 square for either one of my knights. 19. ... d5! (D)


It felt great to be able to get this position over the board. Everything just works beautifully for black and the practical difficulties proved too much for my opponent to handle. Neither pawn capture is particularly desirable for white.

If 20.dxe5 then 20. ... dxe4 21.Nxe4 N7xe5 connects my knights and opens the d-file leaving white's queen uncomfortably staring into the gaze of my Rd8.

20.exd5 is not quite as bad, but even so I can calmly recollect the pawn with 20. ... Nb6 and if white completes his lengthy pawn grab with 21.Bxd3 cxd3 22.Qf1 Rxd5 23.Qxd3 black can continue playing actively with 23. ... f5! creating the unpleasant threat of f5-f4, trapping the bishop on e3. Considering white's dormant rooks on a1 and b1 and the immense pressure on d4, black has more than sufficient compensation for one measly pawn.

Instead, white opted to keep the tension and immediately go for 20.Bxd3 cxd3 21.Qf1? (D)


Instead it was necessary to insert 21.exd5 Nb6 and only then play 22.Qf1. Now, I have a neat tactical resource to preserve my pawn on d3.

21. ... dxe4 22.Nxe4 f5 Intending to follow up with e5-e4 after the knight moves, securing a powerful advanced protected passed pawn. White plays the most testing way with 23.Ng5 (D)


Threatening a fork on e6, but I had seen in advance that I can simply cover all my bases with 23. ... Qc4 Defending both e6 and d3. I now intend to continue with e5-e4, when the knight on g5 could even get trapped with h7-h6. If white stops me by taking on e5, then all of my pieces spring to life after ...Nxe5.

24.Nf3 e4 25.Nd2 Qc6 (D)


This is a highly unusual position. We both have protected passed d-pawns but the black one on d3 has a much stronger cramping effect than the white one on d4. If white does nothing, then I will apply further pressure with Nb6 and eventually a5-b4 to undermine the d4 pawn. I suspect my opponent grimly realized at this point how far south things had gone and rather than sit passively to watch, he frantically tried to mix things up.

26.a4 bxa4 27.d5 Pure desperation. 27. ... Qa6 There is no need to allow 27. ... Qxd5!? 28.Rxa4 when a7 falls next and white gets some counterplay (although black still has a large advantage). 28.b3 Desperately trying to activate the rooks. 28. ... Bxc3 29.Rxa4 Qb5 (D)


White has succeeding in making things messy, but in the process I have won a pawn and all my pieces are actively placed. Black should be winning now.

30.Nc4 Threatening a cheap fork on d6. 30. ... Qxd5 31.Rc1 Bd4 32.Ra5 Rc5 33.Rxa7 Ne5 (D)


Simple centralization usually gets the job done. If 34.Nxe5?, then 34. ... Rxc1 35.Qxc1 Bxa7 picks up an exchange. Otherwise, I have a triple attack on c4 which is only defended twice.

34.Ra4 Now I simplify the position by trading pieces, which generally should be the primary goal when one is ahead material: 34. ... Nxc4 35.Bxd4 Qxd4 36.Raxc4 Rxc4 37.bxc4 (D)


From here, I could win slowly by simply going after the c-pawn with 37. ... Rc8 and then queening the d-pawn by brute force, but there is a much more expedient method: simply ripping apart the white king's pawn shelter and playing for mate.

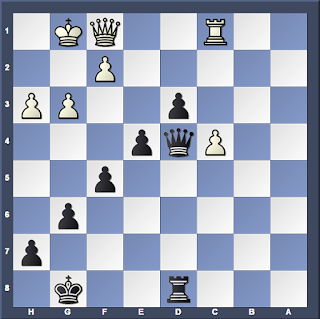
37. ... e3 38.fxe3 Otherwise e3-e2. 38. ... Qxe3+ 39.Kg2 Rb8 Activating all my forces in the attack. A rook and a queen may only be two pieces, but when working together they are more than capable of checkmating an exposed king. 40.h4 Rb2+ 41.Kh3 (D)


41. ... Qe4 The final quiet move to finish things off. White cannot defend against Qg4# without allowing Qg2#. 0-1

Next time I think I'll go through some more endgames!