The position below is from a game I played against NM Daniel Johnston in 2018 (I was white).

Ok, so what's going on here? The position looks about equal - black has the bishop pair but in return has a worse pawn structure and a passive rook, so ultimately these things balance out somewhat.
From the diagram, it was black to move, and Daniel played 20. ... e6 (D)

Now, it's my turn. So naturally I have some short-term goals and stuff that I would like to do - for example I want to centralize my king and maybe also get my knight to a more active square. But it's important to not just quickly play something like Ne5 or Kf1 here, because maybe black has an idea of his own behind the move ...e6 that we should consider and take steps against.
Fine, so before making a move, let's ask ourselves, "why did he play ...e6?" Well, at first glance maybe it's not so obvious, but you can see that it opens up the a3-f8 diagonal for his dark squared bishop - maybe he wants to play ...Bf8 and attack my rook? Ok, so what - if he does that then I'll just move it away; no harm done. But hold on a second, what if after that he then breaks out with c6-c5? Then he gets some activity - maybe in the future he'd be able to play cxd4 (although not immediately because of the pin) or even c5-c4 to make a passed pawn. I decided that I didn't want those things to happen, so I found a way to "stop" ...Bf8 from chasing my rook away. What move did I play?
The move I came up with was 21.Bd6! Now, if black still wants to play ...Bf8, I'll just trade the bishops and leave my dominating rook on c5.
While my move seems sort of random if you're not thinking about black's plans, once you see what black wants to do you can understand the logic behind Bd6.
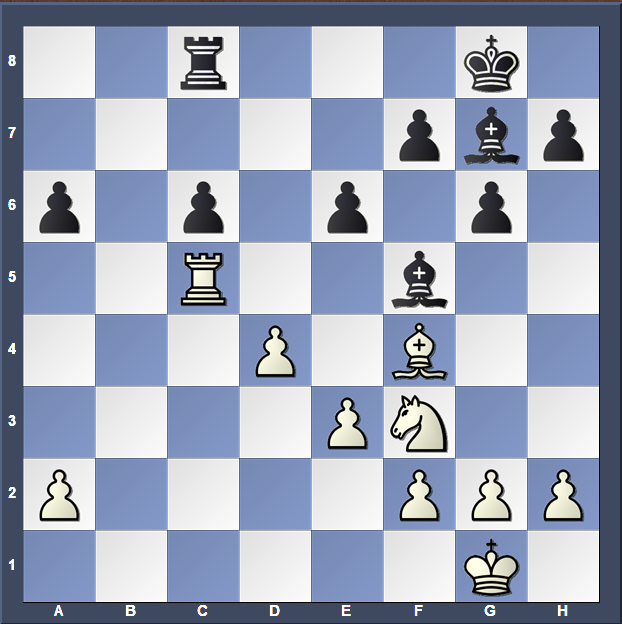
Black continued with 21. ... Bd3 (D)

Notice how Daniel is also hindering me from executing one of my own plans - now my king has a hard time getting out.
Ok, so what do we do now? Just play a quick move like Ne5 to chase the bishop away? No, not so fast. We should do the same thing as before and try to figure out if there is some other idea behind ...Bd3 that we can stop. It turns out that there is.
If the bishop could move again, where might it go? There's a few options but the one I was worried about was b5. Imagine that bishop sitting on b5 - it defends both c6 and a6 and although in theory I could kick it out with a2-a4, you'll see that it's actually not so easy to come up with an efficient way to do that. Once c6 and a6 are anchored, his rook will be free to roam around and do stuff. I decided I didn't want any of that to happen, so I stopped ...Bb5 with 22.a4!
Daniel responded with 22. ... f6 (D)

Alright, so once again we should ask ourselves, "what's his plan with ...f6?" Do we need to take any preventative measures?
Well, the only things I could think of is that maybe black wants either ...e6-e5 or ...g6-g5 or simply wants to activate his king via f7 while keeping my knight from advancing.
I have good control over e5, so I shouldn't be worried about that pawn break. I wasn't worried about g6-g5 either - if black wants to waste several moves to start a pawn storm, then he can go ahead. We're in an endgame and I'm not going to get mated; those pawns will be weak later.
So ultimately, I decided that I don't have to take any preventative measures - this means I can finally start doing my own stuff.
From the diagram, I continued with 23.Nd2 to relocate my knight; my plan is f3-e4 and Kf2. After 23. ... Bf8 24.Bxf8 Kxf8 (D) we reach the following position:

We've only gone five moves from the initial position but look how much things have improved for me - we have a classic good knight vs. bad bishop, black's rook is still passive, and even his bishop is in danger of getting trapped if he's not careful. I can continue with things like f3-e4, Kf2-e3, and Ra5 & Nb3-c5 to target the a6 pawn. We've gone from rough equality to white having a pretty serious advantage.
However, it could have been a very different story if I did nothing to stop ...Bf8 and ...c5 earlier, or if black's bishop became outposted on b5 with my pawn still on a2. If either of those things had happened, I probably would only have a small plus, if anything at all.
From here the game becomes less about prophylaxis and more about how to convert an advantage, so I'll just briefly go through the rest.
From the diagram we continued 25.Rc3 Be2 25. ... Bf5? 26.e4 Bg4 27.f3 Bh5 28.g4 and the bishop is lost. 26.Ne4 Ke7 27.f3 (D)

Intending Kg1-f2 to start rounding up the bishop. Notice how black's rook is for now unable to go to the b-file because it has to defend c6.
27. ... Bd1 28.Rc4 keeping the bishop in a cage. I accomplish nothing after 28.Nc5? because it allows 28. ... Rb8! when black's rook suddenly becomes very active after 29.Nxa6 Rb1! 28. ... Rc7?? (D)

The decisive mistake.
29.Nc5 Had the rook been on c8, black could play ...Rb8 and get counterplay, but unfortunately for him b7 is covered now - there's nothing to be done about Rc1, eventually trapping the bishop. 29. ... Rc8 30.Rc1 1-0 On 30. ... Be2 there is 31.Kf2
This detailed example should illustrate the importance of being aware of your opponent's ideas and taking measures to stop them if they become threatening. A good player will have his own plans, but a master player also constantly thinks about his opponent's plans and actively tries to hinder them.
Now, it's my turn. So naturally I have some short-term goals and stuff that I would like to do - for example I want to centralize my king and maybe also get my knight to a more active square. But it's important to not just quickly play something like Ne5 or Kf1 here, because maybe black has an idea of his own behind the move ...e6 that we should consider and take steps against.
Fine, so before making a move, let's ask ourselves, "why did he play ...e6?" Well, at first glance maybe it's not so obvious, but you can see that it opens up the a3-f8 diagonal for his dark squared bishop - maybe he wants to play ...Bf8 and attack my rook? Ok, so what - if he does that then I'll just move it away; no harm done. But hold on a second, what if after that he then breaks out with c6-c5? Then he gets some activity - maybe in the future he'd be able to play cxd4 (although not immediately because of the pin) or even c5-c4 to make a passed pawn. I decided that I didn't want those things to happen, so I found a way to "stop" ...Bf8 from chasing my rook away. What move did I play?
The move I came up with was 21.Bd6! Now, if black still wants to play ...Bf8, I'll just trade the bishops and leave my dominating rook on c5.
While my move seems sort of random if you're not thinking about black's plans, once you see what black wants to do you can understand the logic behind Bd6.
Black continued with 21. ... Bd3 (D)

Notice how Daniel is also hindering me from executing one of my own plans - now my king has a hard time getting out.
Ok, so what do we do now? Just play a quick move like Ne5 to chase the bishop away? No, not so fast. We should do the same thing as before and try to figure out if there is some other idea behind ...Bd3 that we can stop. It turns out that there is.
If the bishop could move again, where might it go? There's a few options but the one I was worried about was b5. Imagine that bishop sitting on b5 - it defends both c6 and a6 and although in theory I could kick it out with a2-a4, you'll see that it's actually not so easy to come up with an efficient way to do that. Once c6 and a6 are anchored, his rook will be free to roam around and do stuff. I decided I didn't want any of that to happen, so I stopped ...Bb5 with 22.a4!
Daniel responded with 22. ... f6 (D)

Alright, so once again we should ask ourselves, "what's his plan with ...f6?" Do we need to take any preventative measures?
Well, the only things I could think of is that maybe black wants either ...e6-e5 or ...g6-g5 or simply wants to activate his king via f7 while keeping my knight from advancing.
I have good control over e5, so I shouldn't be worried about that pawn break. I wasn't worried about g6-g5 either - if black wants to waste several moves to start a pawn storm, then he can go ahead. We're in an endgame and I'm not going to get mated; those pawns will be weak later.
So ultimately, I decided that I don't have to take any preventative measures - this means I can finally start doing my own stuff.
From the diagram, I continued with 23.Nd2 to relocate my knight; my plan is f3-e4 and Kf2. After 23. ... Bf8 24.Bxf8 Kxf8 (D) we reach the following position:

We've only gone five moves from the initial position but look how much things have improved for me - we have a classic good knight vs. bad bishop, black's rook is still passive, and even his bishop is in danger of getting trapped if he's not careful. I can continue with things like f3-e4, Kf2-e3, and Ra5 & Nb3-c5 to target the a6 pawn. We've gone from rough equality to white having a pretty serious advantage.
However, it could have been a very different story if I did nothing to stop ...Bf8 and ...c5 earlier, or if black's bishop became outposted on b5 with my pawn still on a2. If either of those things had happened, I probably would only have a small plus, if anything at all.
From here the game becomes less about prophylaxis and more about how to convert an advantage, so I'll just briefly go through the rest.
From the diagram we continued 25.Rc3 Be2 25. ... Bf5? 26.e4 Bg4 27.f3 Bh5 28.g4 and the bishop is lost. 26.Ne4 Ke7 27.f3 (D)

Intending Kg1-f2 to start rounding up the bishop. Notice how black's rook is for now unable to go to the b-file because it has to defend c6.
27. ... Bd1 28.Rc4 keeping the bishop in a cage. I accomplish nothing after 28.Nc5? because it allows 28. ... Rb8! when black's rook suddenly becomes very active after 29.Nxa6 Rb1! 28. ... Rc7?? (D)

The decisive mistake.
29.Nc5 Had the rook been on c8, black could play ...Rb8 and get counterplay, but unfortunately for him b7 is covered now - there's nothing to be done about Rc1, eventually trapping the bishop. 29. ... Rc8 30.Rc1 1-0 On 30. ... Be2 there is 31.Kf2
This detailed example should illustrate the importance of being aware of your opponent's ideas and taking measures to stop them if they become threatening. A good player will have his own plans, but a master player also constantly thinks about his opponent's plans and actively tries to hinder them.
If Bf8 (to prevent Bd6) instead of e6 I would've had a fine position. Evidence that not playing for months will lead to some strange mistakes...
ReplyDelete